Sunday, April 24, 2011

Paella - Silly Rabbit

Mmmmmmm, paella...no doubt it's one of the first dishes people think about when thinking about Spanish food. A lot of people think about seafood when thinking about paella, but seafood isn't how it all started.

The first paellas were evidently made in Valencia, which is a port city, but they actually contained inland foods - think snails, chicken, rabbit - along with runner and butter beans. They were made by the rice farmers, and farmers have fields, and fields have all of the above, so Paella Valenciana was made with stuff from the land. But no matter what your paella contains, it's really all about the rice, isn't it? Because when done correctly, the paella has both perfectly separate, tender grains of rice along with crispy, caramelized rice that forms on the bottom of the paellero - the socarrat - or the holy grail of a perfect paella.

I've been on a paella kick; that is, I want to learn how to make a good one. But of course to make a good paella, one first needs to taste a good paella - and that's easier said than done. Last year, down in DC, I saw what may be the largest paella made in the U.S. - I can't vouch for Spain, but Significant Eater and I were at one of those dreaded street food fairs down in D.C. and we happened upon a crew from José Andrés' Jaleo restaurants working their magic...

We didn't stick around to taste it, as they had just started the batch, and have I mentioned I'm not a huge fan of waiting on lines at those dreaded street fairs?

Then last fall we went to Spain; Barcelona, to be exact. And while we had some amazing and excellent food in Barcelona, the one paella we had wasn't, in my opinion, a seminal one. Oh, it was good and we ate it at a particularly beautiful restaurant right on the beach, but it didn't knock our socks off, taste wise...

Here in NYC, one of the standards for paella is Socarrat Paella Bar. Now, considering there are only 4 or 5 places to actually dine on paella in NY, saying it's the standard bearer isn't really saying that much. But they've opened a second outpost on Mulberry Street in Nolita, and Sig Eater and I have dined there twice over the past couple of months. Guess what? From my limited knowledge about paella, all I can really say is that it tasted great which is basically what we're looking for when we dine out. Looked good, too...

So now, I'm about to make my own. I bought a new one of these (confession: I've tried before, once or twice, with a really small paella pan I have, and it has been ok)...

That's a 15" pan, about the smallest size you should be using to cook up a nice batch of paella. It'll feed 4 comfortably, provided you have some snacks before. I wanted to make a non-seafood paella, so I bought a rabbit, a couple of chicken legs and a mess of baby artichokes, which were on sale earlier this week. The chicken and rabbit were chopped into bite-sized pieces, the artichokes were prepped and cut into quarters, the chicken stock was simmering on top of the stove and the rest of my mise looked like this...

Traditionally, paella was cooked over an open fire...they didn't have ovens out in the fields. But in lieu of that open fire, a stove top or hot barbecue grill is acceptable. Or a setup like the Andrés crew above. Because you want to cook paella atop the heat source, not within an oven. Why? Because that's the way it's supposed to be done. Even though - many cookbook recipes have the paella finishing in the oven after starting out on the stove top; I suppose it's harder to fuck up that way. For me though, it's stove top only...I'm a traditionalist.

First, the chicken, rabbit and chokes got browned in some olive oil. Next, the tomatoes and garlic were turned into a dark paste in the center of the pan, and tossed with my by now browned goodies. I added the stock, brought it to a simmer for a few minutes, and added the rice, spreading it out so it was all covered with simmering stock. From this point on, stirring is not allowed, but making sure the rice is covered with stock by pressing is. Go figure. After about 10 minutes, it looked like so...

Then, the heat is turned down to a gentle simmer. A few minutes later, the paella looked like this...

The whole cooking time, by the way, was spent turning the pan round and around on 2 burners in order to have the rice cook evenly. The rice continued to cook for another 5 - 10 minutes (for a total cooking time of about 21 minutes), and when I thought some nice socarrat had formed, the heat was turned off, the pan was covered and allowed to rest for 10 minutes - a very important step, evidently. Here's the paella as it was brought to the table...

The verdict? While I still have a long way to go, this paella was pretty tasty. Not enough socarrat (is there ever?), and I will brine the rabbit next time if I use it...it just isn't the most exciting of meats and could use some help. And while I used a high-end purchased chicken stock, it's nowhere near as tasty as my own. It's a learning process, to be sure; after all, Valencian palleros have been making their paella for hundreds of years.

Tuesday, April 12, 2011

The "Perfect" Whole-Wheat Bread - Almost

Okay, it's time. Time again for me to try another one of those Cook's Illustrated recipes. Just like I did last December, when I tackled their "Best Pizza Ever" recipe. Without hesitation, I can say that the pizza dough I made using that recipe really came out great.

Well, once this month's Cook's Illustrated arrived, how could I wait? There it was, right on the cover - "Secrets to Perfect Whole-Wheat Bread." Of course, the whole cover of Cook's Illustrated is, ummmmm, covered with those types of pronouncements. For example, just on that same issue's cover you get:

Dressing Up Steaks - Shortcut to 4-Star Pan Sauce

Broccoli-Cheese Soup - Throw Out the Rule Book

Real Boston Cream Pie

All About Butter

Who knew it was so easy? But that's what makes Cook's Illustrated great, and also one of the few food mags that I literally read cover to cover. Now, onto those perfect loaves of whole-wheat bread.

First, understand that it takes 18 - 24 hours from the start until you actually have something resembling a loaf of bread that can be eaten. Second, I can literally take a 10 minute walk to the Essex St. Market and buy a great, artisanal whole wheat bread for about $4 a loaf, which makes me think that there's a lot of work, and it takes a lot of time, to make my own. And unless it's categorically better than Pain d'Avignon's, why bother?

Well, I'm a cook, and I'm a food geek, so why the hell not? Also, I had all the ingredients on hand.

I didn't take pictures of the process, only the results, but it starts the night before with a biga (which is a starter, which is a pre-ferment, which is…something I wrote about here) and also a soaker, which allows the whole-wheat flour to develop to its fullest potential. As I told you, it's very scientific, and much more nerdy than I care to explain here.

The next morning, you actually put the dough together - and having a Kitchen Aid or other heavy-duty stand mixer comes in handy; otherwise, prepare for lots of kneading. Once the dough comes together, then it's only about 3 more hours till it's baked, and 2 more till it cools enough to cut into. Whew.

Now, before showing you the finished product…a mea culpa. Instead of the bread flour called for in the recipe, I mistakenly used all-purpose flour, and that may be the reason for one of the admittedly minor grievances I had with my loaves. So here's what the bread looked like after baking…

And then the loaf cut in half…

And finally, a close-up of a slice…

A couple of things. Take a look at that 'tunnel" up in the right-hand corner of the slice. Not good. Not terrible, but probably not something I should be proud of. Next, see how the "crumb," which is the interior texture of the loaf, gets tighter and tighter towards the bottom of the slice? That's called, I believe, pudding-y, or at least something like that. Whatever it's called, it's not what you're looking for. It might be due to the lower gluten content of the flour I used vs. bread flour. Taken altogether, not a bad first attempt.

If anyone has any suggestions as to what might've gone wrong - I'm all ears.

Although next time, I'll probably head over to the market - it's just so much easier.

Tuesday, April 5, 2011

Psssst...They're Baaaack

Oh, you know what's back. That first (for us in the northeast, at least) harbinger of spring. Yes, the vegetable that I wrote about last year when I was totally sick of them.

I just happened to be at Eataly yesterday, and there they were, the divas all nice and pretty in their little basket at the front of the produce section. I had been at the Union Square farmer's market on Saturday with Significant Eater, and they were nowhere to be found. Restaurateurs have been tweeting about cooking with them for about a week, but for we mere consumers, nada. Until...

Yay...ramps for shoppers. I greedily snatched up a bunch or two, along with a pound of fresh favas (shhh...they're not local). And tonight, here's what I had to work with...

I figured I'd keep it real simple, so I braised the favas, along with the ramps, in a cup of homemade chicken stock...

Cooked up a portion or two of pasta, and tossed it all together with a big handful of pecorino and parmesan, freshly grated, of course...


And sat down to my first ramp-y meal of the season. I can almost see the end in sight.

Pasta With Ramps and Favas

1 or 2 bunches ramps, cleaned, chopped, greens saved for garnish
1 lb. fresh favas, shelled
1 cup chicken stock
4 T olive oil
2 oz. parmesan, pecorino or both, grated
8 oz. pasta - (rotini, orecchiette, farfalle)
1 T Minced parsley
Salt & Pepper to taste

Bring well-salted water to a boil for pasta. Meanwhile, saute the ramps and favas for a minute or two in hot oil. Add chicken stock, salt and pepper to taste and bring to a simmer. Cover. When pasta is almost al dente, remove it to the pan with the favas. Toss well and add some pasta water if necessary. Off heat, add cheese by handfuls, along with minced parsley and ramp greens. Keep tasting, adding more water and or/cheese till sauce just coats pasta.
Serve, with more freshly grated cheese and pepper. Serves 2.

Friday, April 1, 2011

Tender at the Rib - Exploring BBQ Around DC

With a year and a half of traveling to DC on a fairly regular basis now under my belt, I still don't really have an opinion on what's the best barbecue anywhere in the area. So much of what I've tried is pretty bad; bad enough where I have no remembrance of the names. There was some place up on 14th St NW that sucked. Badly. It had the appearance that it might be good - big stack of logs in the front window. Inside, just a bullet-proof glass window where you ordered and picked up...like at a bank or a post office. To no avail. There's Hogs on the Hill. Which may have been good on one of my visits, but was really not on my next time back. And a few others. But then there was this, which I stumbled upon one afternoon while taking a drive with a friend to have lunch...

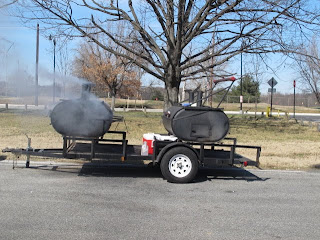
Remember, we were going to lunch, so we didn't stop. We stopped on the way back instead. To greet this guy, who was manning the smokers...

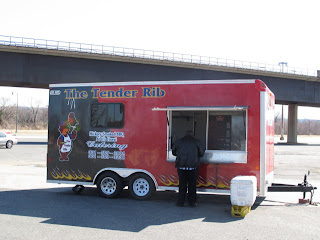
And selling his wares out of this portable unit...

It's The Tender Rib, which is evidently parked right smack dab in the middle of this parking lot, in the middle of nowhere, somewhere out near RFK Stadium, on Thursday and Saturday afternoons. Actually, it's on Benning Road NE, if that helps. They fortunately have a website to go along with their bricks and mortar operation, since we'd just had lunch and didn't order anything. But he ran over to our car and insisted we try at least a taste of his ribs...

So how were they? Simply, the best ribs I've tried in the area. And actually, maybe as good as any others I've tried. Pink ring, nice and smoky, Tender, juicy with just the right amount of chew. A rub that's not overpowering but complimentary to the flavor of the pork. There wasn't any sauce on these samples; they didn't need any. I can't wait to try out all their barbecue and a trip to the restaurant is in our immediate future...

Interestingly enough, there's another guy who operates his smoker in a parking lot and out of an old bus parked off of Rhode Island Avenue. In a Safeway parking lot. It's called Mr. P's Ribs and Fish. Supposed to be good. Last time I stopped there, Mr. P was closed. And I can't forget, of course, about the big news; Hill Country BBQ has opened a huge (300 seats) restaurant in DC, two weeks ago in the Penn Quarter neighborhood. Currently, it has a lot of people confused; about the quality, about the ordering and about the whole ticket shebang, which works sort of like Katz's, so here's a tip...if it works for Katz's, it works. I'm going to let it settle in before Significant Eater and I head over there for what I hope is some damned good brisket.

Finally, on my drive down to DC this past Wednesday, I made a stop at Red, Hot and Blue Barbecue, which is just outside of Annapolis, and an easy hop-off, hop-on from Route 50, from which it's quite visible. I've heard about them for a long time (there are 3 Maryland locations and it's a franchise - who knew?!) and figured I'd bring home a sack full of stuff so SE and I could eat 'cue and watch the finale of Top Chef. I brought home a sampler of ribs, brisket and sausage.

And you know what? The Top Chef finale was so much better than our dinner, it wasn't even close.